Even though a fan of Command and Colors: Ancients, I was surprised to learn about the Kickstarter for a "Space Fleet Warfare" version of the game. Seemed like it might be a "stretch" for the system. So I downloaded the rules from the Kickstarter site and quickly saw that not only wasn't it a stretch, it was actually a pretty good way to portray the "relative positional" nature of what I think battles between capital ships might look like, as opposed to gaming them like "dogfighting" smaller, fighter-type ships. Could this be the way to play with my Star Trek models? Maybe. . .
I jumped in with both feet and got all the unlocked supplements, too. There are lots of reviews and "unboxing" videos on the web, so I won't go into detail, but I will say the components are very nice. . .
The supplements are impressive, too. More ship types, terrain tiles and additional rules. And dice!
The board - mat, in this case - is nice and big. Fills up half the ping-pong table we play on.
And it works with my 1/2500-scale Star Trek models.
Rather than play with multiple models per hex as provided, I'll play with a single model with multiple "shields" instead.
Do you have your ticket yet for the Wiley Wargame Weekend? Whatcha' waitin' for?
See ya!
Read Chapter One here. A Chapter ends when the Tiffin Card is the first card turned up in a turn, so can theoretically happen at the beginning of any turn. It represents a cinematic lull in the action. Some battlefield housecleaning can happen, like all unloaded groups reload, or groups low on ammo can re-supply if their force has an Ammunition Wagon. Well. . . the Indians were low on ammo. No wagon was available, but in the spirit of "Kriegspiel" we suggested they would have had the time to scrounge the ammo from the dead Marines around them, so permitted them to re-supply.
Chapter Two started with the deployment of the Provincial Status II Leader at the barn with the second group of Regulars. Shortly after, reinvigorated musket fire from the Indians loaded the British Regulars with enough shock to force them to retreat. Another roll on the Bad Things Happen Table and another reduction to British Force Morale followed.
One of the Marine groups was down to one man and its Leader. The Provincials in the Farmhouse traded more casualties and shock with the French Militia.
Then that little Marine group captured the British Primary Deployment Point which caused a big roll on the Bad Things Happen Table. British Morale was beginning to erode!
The Status III British Regular Leader finally rallied off enough Shock to get his group moving across the back of the farm. The Regulars moved up to engage the French Militia while the Provincials moved up to support the British Regulars.
The Provincial Regulars in the farmhouse, who had been under fire from both groups of French Militia and the Indians, were eventually killed to a man. Another roll on the Bad Things Happen Table led to another Morale reduction. With no more fire coming from the farmhouse, the Provincial Rangers made a run for it, braving a withering fire from the Indians in the tree line!
The Rangers made it into the farmhouse and began to fire into the French Militia and Indians in support of the British and Provincial Regulars. The red-capped Militia were forced to retreat a couple of times, finally forcing the French to roll on the Bad Things Happen Table. Another Random Event got the blue-capped Militia an extra firing action into the farmhouse, wounding the Ranger Status II Leader and reducing him to Status I. Another roll on that damned Table. . .
The red-capped Militia broke and bolted - another French morale reduction.
The Indians finally had enough of pot-shooting from the trees and seeing the Ranger fire from the farmhouse dwindle, burst from the woods with a blood-curdling noise!
The Indians attacked the farmhouse, losing a couple of their brothers to Ranger musket fire on the way in. The "tomahawks" rule turned out to be nasty used with a group this big, and the Rangers were overwhelmed and slaughtered.
The loss of the Rangers took the British Force Morale down to "1," so the British conceded, as they were way behind the French on the Morale Track.
What did we think of the game? To a man, our Gang of Four all agreed we want to play Sharp Practice 2 again, despite our intro to the game lasting 6 hours! So why did it take us 6 hours? Well. . . it was our first game and we knew there would be a learning curve, though our later turns seemed to breeze along at a decent pace as our comfort level increased. There were a couple of additional reasons.
First, about halfway through the first Chapter we apparently thought we had the Hit Effect Table memorized and stopped referring to it, and began only counting Kills in Hard Cover, but not applying the appropriate Shock. This kept all of the groups in the buildings and in the trees (because Skirmishers count as one Cover level higher) operating longer and at full capacity, rather than suffering the effects of Shock.
Second, I gave the Provincial Skirmishers a Moveable Deployment Point they shouldn't have had. Without this Moveable Point, all of the British would have deployed entirely from the Primary Point on the road and the fight would most likely have been less centered on the farmhouse, and been less of a "siege." The Deployment Point mechanics are a feature of the game I really like.
Thoughts on the rules overall? SP2 is fun. The focus on leaders is cinematic and provides a lot of opportunities to effect the course of the battle. Management of your forces, and using the rules to get the best performance from each group under your command, are key to winning on the SP2 battlefield.
SP2 is not complicated, but it has a lot of moving parts. It is important to fully understand the nuances of the game mechanics. In particular, one needs to understand the differences between Command Initiatives and Activations, and Groups versus Formations. Actually playing the game helps bring it all into focus, and we found the video "tutorials" from the Lardies really helped us in our first game.
I want to play Sharp Practice 2 some more. See ya!
A couple weeks ago we played our first game of Sharp Practice 2 from Too Fat Lardies. I gathered the guys - all willing to give a new set of rules a whirl - after sending them the links to the Lardy tutorial videos.
FYI I don't intend to review the rules per se in these posts, as there are plenty of thorough reviews already on the net, but I will mention some key mechanisms as I go, and provide some personal views, too, mostly at the end of the posts.
The
goal for the day was to play a simple game, in its entirety, knowing we
would make plenty of mistakes in both tactics and rules applications,
to get a feel for the overall experience of the game. Accordingly I put together two "representative" 1755-ish opposing forces of 53 points (including support options). . .
• Note we are using the wooden markers to denote the "leader number," important because leaders are activated when their card is turned up, and the D4 the leader's Status, which can change due to wounds, etc. •
Both sides rolled up an "11" on the Force Morale Chart, which tracks how committed each force is to the battle; the commitment can degrade as "bad things happen" during the battle and when a force's rating falls to "0" it quits the field!
I divided the terrain about evenly between "wooded" and "cultivated."
View from the British side's corners:
View from the French side's corners:
We used the Meeting Engagement scenario straight from the rules.
Leaders are activated when their card is turned up during game play, and they may only deploy, with their assigned groups, when their card appears. A Primary Deployment Point for each side is determined at the beginning of the game, and if purchased as a Support Option, additional Moveable Deployments can be deployed, then moved during card play, prior to actual deployment of groups. The British rolled up the "#2 Point" on the road (blue arrow above):
Their Moveable Deployment Point, belonging to the Rangers (which they actually weren't entitled to - oops) was assigned to the dogtrot barn on the farm:
The French rolled up the "#3 Point" in the woods (red arrow above) and added a Moveable Deployment Point and a dummy Moveable Deployment Point deeper into the woods:
Let the fightin' commence! The French got the early cards for deployment and did a good job pf pushing their Moveable Deployment Points deeper into the woods. The Marines and Militia were quickly deployed along the edge of the woods.
The British Rangers deployed first into the barn, while more French Marines popped up along the treeline.
The Militia got an extra turn of movement due to the early appearance of 4 French Command Cards, and dashed out of the darkness of the woods!
The Status I Leader of the Provincial Regulars deployed next into the Farmhouse; the French Militia moved up to the fence and opened fire on the house.
Meanwhile, the British Status III Leader was getting concerned about his Primary Deployment Point - the French were dangerously close to it and several turns ended without his Leader Card turning up. Instead, the Status I Leader had to be sent with just one of the groups of Regulars to defend the Primary Deployment Point. The French were so close that the group was just barely able to deploy, sending a volley into the Marines at the treeline to try to buy some time to move forward.
When the card for the British Status III Leader turned up, there wasn't room to deploy at the Primary Deployment Point, so they deployed instead at the barn, and tried to draw fire away from the other group of Regulars embattled on the road.
Both groups of French Militia poured lead into the farmhouse; the Provincials inside returned fire.
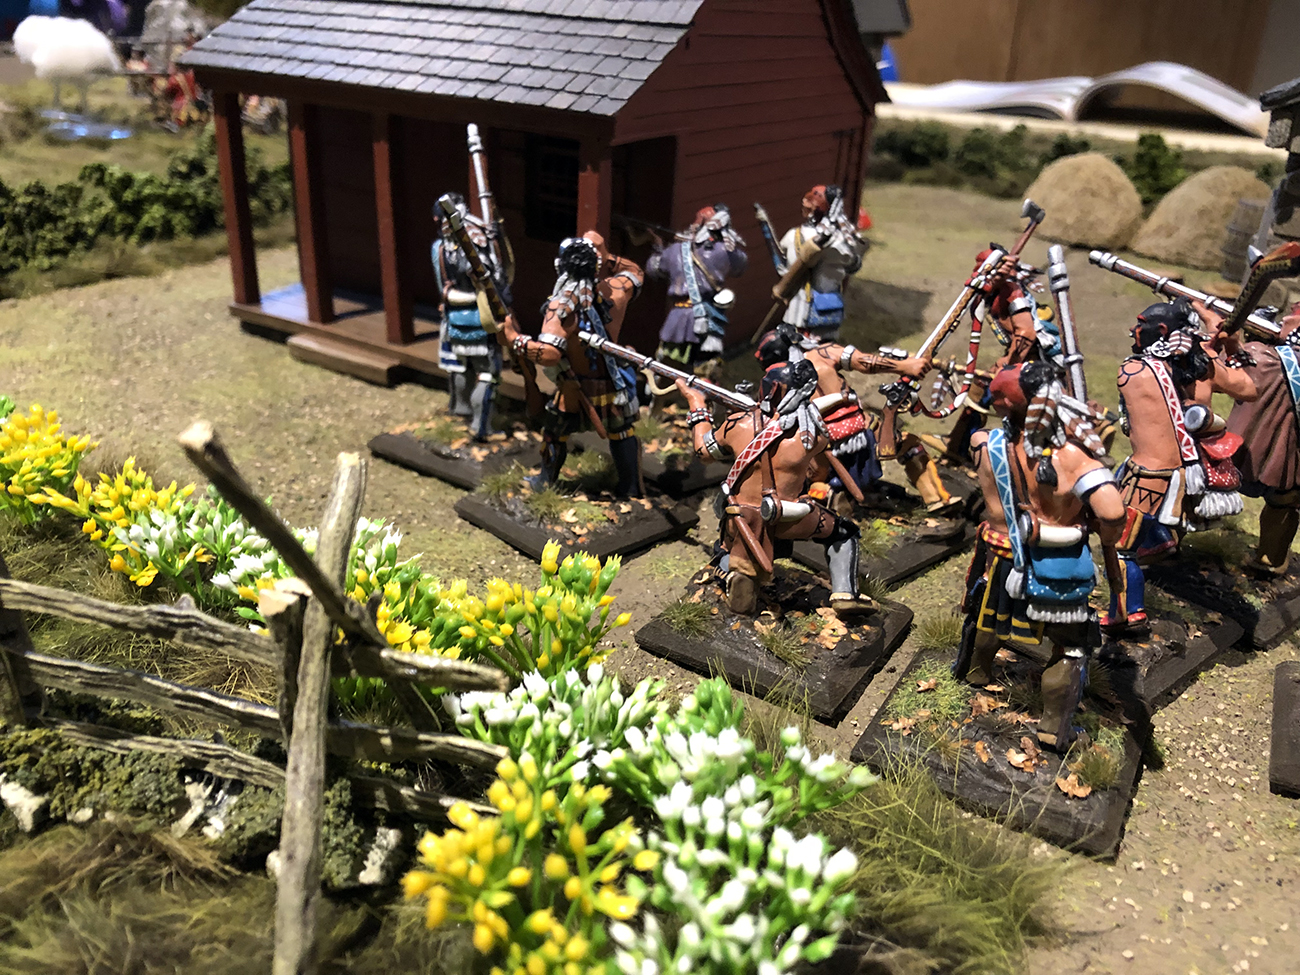
Suddenly the Natives showed up, and added to the fusillade of bullets ringing against the farmhouse.
The fight on the road turned bloody. One of the Marine groups was getting mauled, but the British Regulars in the open were taking casualties and accumulating Shock at an alarming rate. . .
. . .which eventually forced the Regulars off the table! This meant a roll on the "Bad Things Happen Table" and a 2-point reduction to the British Force Morale!
Without so much as a "by your leave," the Provincial Rangers made a dash for the treeline. The Regulars tried to provide covering fire. . .
. . . but the Rangers were sent reeling backward, with casualties and Shock, by fire from the Marines.
The shooting on the farmhouse was taking a toll of the Provincials inside (we placed the troops on the table edge and tracked losses there), even as losses and Shock mounted on the French Militia.
A Random Event caused the Natives to be low on ammo, impairing their shooting dramatically!
And Suddenly, the cards decided Chapter One had ended!
Chapter Two will follow in the next post. See ya!