I recently played through the first play-test game of Bayonets & Tomahawks by GMT Games. The designer suggested I (and the other play-testers) play the introductory scenario to learn the game before getting into more serious play-testing. The introductory scenario is a one-year representation of King George's War of 1746, with an aggressive France attempting to re-take the fortress of Louisbourg, "stolen" by British Provincial forces the year before, and then conquer Nova Scotia for New France. The British just have to hold on and avoid the French Victory Point conditions to win. Because it is only one year, reinforcements arrive once, in the spring, and you have to do all your campaigning through to winter with what you have. But also because the game only lasts one year, you can go "balls-out" without worrying about your position relative to the coming year (and if you're France hope to keep Louisbourg in the pending Treaty negotiation).
Here is an overview of game play from the GMT website:
Depending on the scenario, Bayonets & Tomahawks can last one or more in-game years. Each year contains nine Action rounds as well as three administrative Logistics rounds (for reinforcements and winter quarters). Victory points, accumulated by capturing and raiding enemy spaces, determine victory.
Units come in three shapes: triangle (light units), square (regulars), and circle (artillery and other). Unit shapes have an important impact on game play.
During an Action round, each player plays a card of his faction, uses its Action points to perform actions and executes its historical event. The French do so with an Indian card also. There is no hand management: each player has a reserve card and may choose to play it instead of the card he draws for the round. Each Action point on a card activates one stack of units, allowing it to perform one action. Possible actions are Movement, Raid, Marshall Troops, Sail, Construction, or Sortie. The cards also include some double Action points that allow a stack to act twice in a row, resulting in sudden strikes.
In battle, each unit rolls a die once. Rerolls may occur via commanders, Highland units, and card events. After all rolls, the attacker wins if he is at a higher position on the battle track than the defender. Bayonets & Tomahawks' custom dice include Flag faces, Hit faces, and a B & T face that gives chrome to some unit types. A unit scores a hit when it rolls a hit face that matches its shape (triangle, square, or circle) and an enemy unit of the same shape is involved in the battle.
During the final game years, War in Europe chits simulate the possibility of peace coming sooner in Europe, thus interrupting the war in North America. To that effect, each player draws one of his War in Europe chits each time he wins a battle or siege. In case of marginal victory at game end, these chits determine who is the winner.
Scenarios
- 1755 Vaudreuil's Petite Guerre (one year)
- 1757 Loudoun's Gamble (one year)
- 1758 Amherst's Juggernaut (two years)
- 1755-1759 French & Indian War campaign (five years)
1746 King George's War (one year)
1755-1759 French & Indian War campaign with historical reinforcements
A reminder of scale:

The action in this first game consisted of raiding and small battles between French light troops and British Provincial Brigades in the interior, with the main fighting between the French and British Regulars happening around Louisbourg.
Fleets are also provided for, and in this 1746 scenario they were instrumental in moving the assaulting French Brigades and Artillery to Louisbourg, as well as the British and Provincial forces that would defend it.
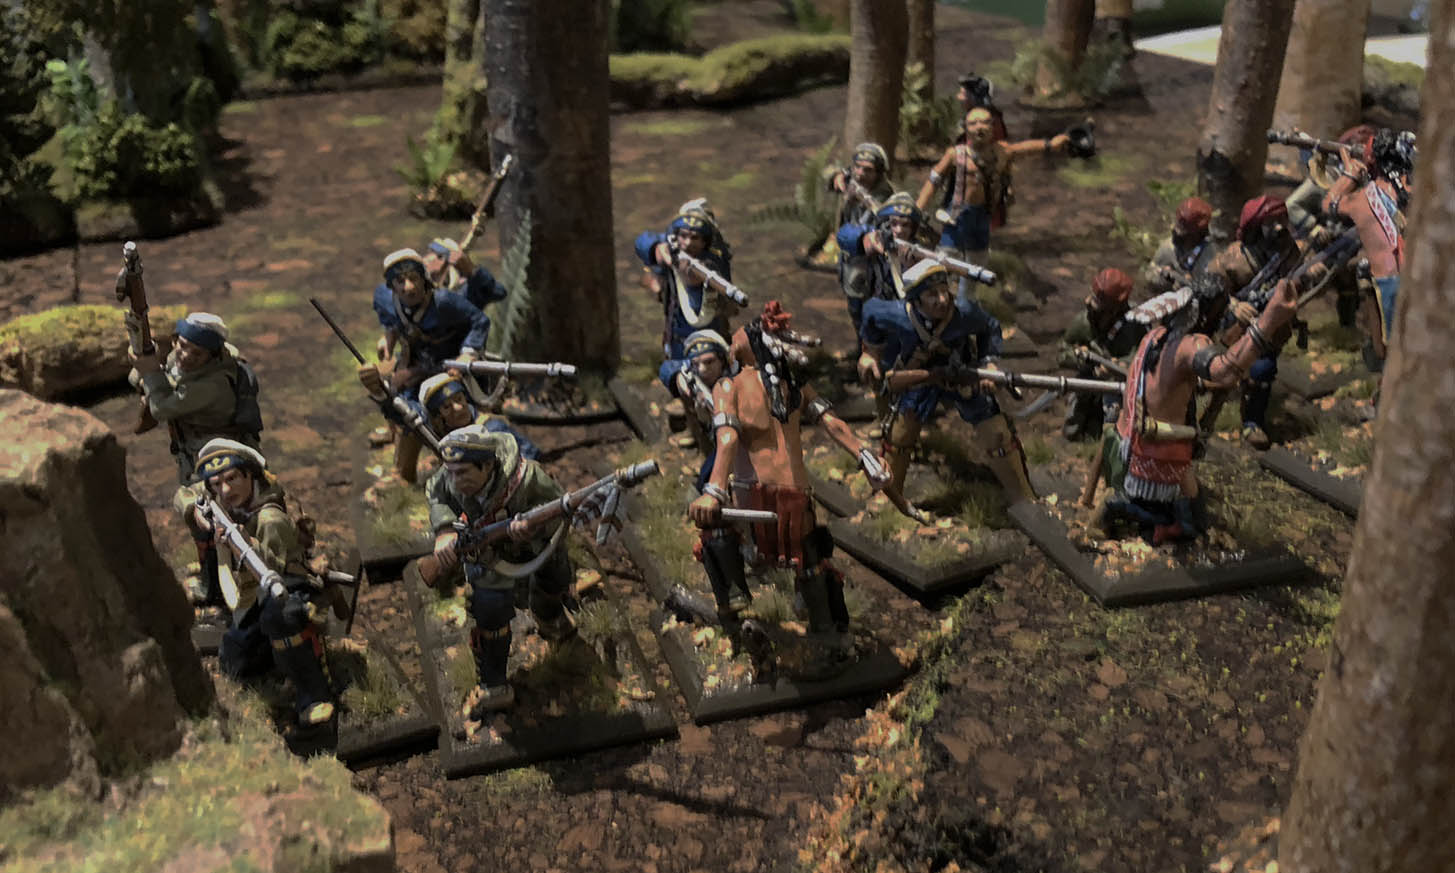
The asymmetrical nature of the conflict is well represented; three key factors loom large. First is the mix of units. The French have a lot more light troops, AND most of the Indian nations. Indians are fickle, though. . . if you use them for raiding, they "go home" for the year with booty and captives after a successful raid. The British have more of everything useful for a conventional conflict: Brigades (Metropolitan and Provincial), Artillery and Fleets.
Second, the campaign year breaks down into functional segments, due to the design of the Action Rounds. The game year is divided into 9 Action Rounds. The first three are "Buildup" rounds, the following six are for "Campaigning."

Fleets arrive in the Spring, after Round 2, bearing reinforcements of Metropolitan Brigades and Artillery. After Round 3, the "Colonists Enlist," providing Provincial Brigades for the coming 6 rounds of the Campaign season. The French and Indians can do a lot of raiding along the frontier with good cards and coordination during the Buildup rounds, before the Provincials arrive and the fort-building begins. The British need the Campaign rounds to "catch up." After Round 9, everyone "goes home" or hunkers down in "Winter Quarters" for the North American winter.
Third, take a look at the entire map.

The wide white lines between the Key Spaces are "Highways." They are the only avenues of travel, besides fleet transport, that the Brigades can use. The light troops and Indians can use these Highways, as well as all of the dotted line "Paths" that connect the interior Spaces. The Brigades have to turn those Paths into "Roads" - by building instead of fighting - to be able to use them. It is easy to see why building that road to the Ohio Forks was so important historically, and why the main thrusts of the British effort used the Albany to Oswego and the Lake Champlain corridors.
So how did my game play out? French victory - just barely - in the final round. Louisbourg fell, along with Northfield in New England (surprise!) to squeak out the barest of wins. Louisbourg was assaulted 4 times, literally costing the French their entire force of Brigades, Artillery and Fleet. They would not have been able to withstand the inevitable British assault on re-captured Louisbourg had there been one more round before winter.
I like the game - will it work for miniature campaigning? I assumed that to get the full flavor of the campaign, I would need to game at two scales, maybe with different rules, one for raids and one for battles. In one year's game time in Bayonets & Tomahawks, I played 11 raids (8 successful) and 8 battles. Raids always consist of one light unit against a Cultivated Space, and could be played out as a man-to-man skirmish, or scaled up to battle scale, but it occurs to me that raiding, because of the number of them, could be relegated to the single die rolls currently in the game and the focus for miniatures could be the battles.
The smallest battle of the game featured 1 British Provincial Brigade (3 units of 10 men per my collection) and 1 Ranger light unit (1 unit of 10 men) vs 2 French light units (1 unit of 10 men each). 40 soldiers vs. 20. That would be a smallish game in our current rules, Muskets & Mohawks, but still playable.
The largest battle was fought outside of the the fort at Louisbourg:
French
1 Fleet (not sure how to represent that in miniature yet)
2 Artillery (2 cannons with 5-man crews)
2 Metropolitan Brigades (2 x 3 units of 10 men)
3 Marine light units (3 units of 10 men)
2 Indian units (2 units of 10 men)
Total 13 units of 120 men
British
1-point Fort (blockhouse and stockade perhaps)
1 Fleet (not sure how to represent that in miniature yet)
1 Artillery (1 cannon with 5-man crew)
1 Metropolitan Brigades (3 units of 10 men)
4 Provincial Brigades (4 x 3 units of 10 men)
Total 16 units of 155 men
I could just about stage this game with the figures I have based and it would be adequately handled by Muskets & Mohawks. Larger battles would happen in the larger, later campaigns. I would need to base up more troops : )
Still considering Sharp Practice 2 for fighting the miniature battles. . . might make the smaller battles more interesting but not sure it can handle the larger.
Will do some more play-testing now and see how large the battles get!
See ya!